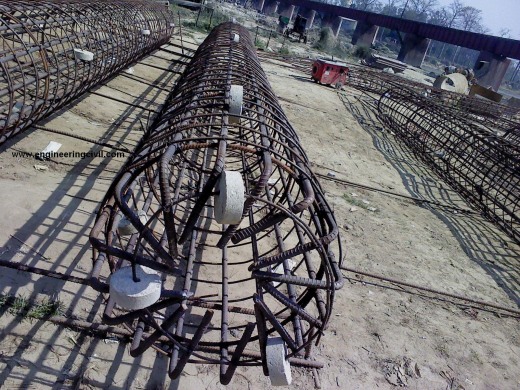
منتخب عکس های عمرانی4 (بحران در ساختمان)
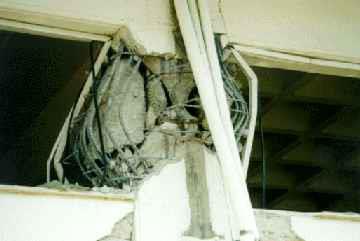
گسیختگی برشی
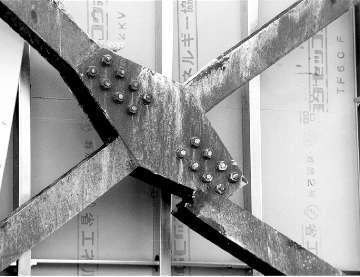
شکست بادبند فولادی
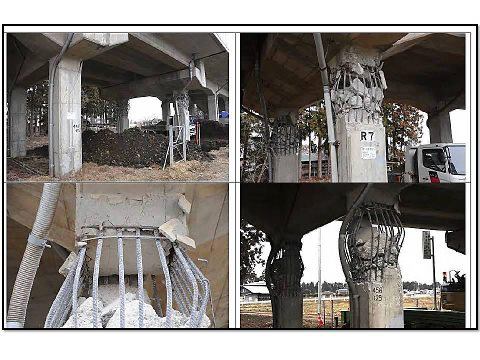
شکست برشی ستون کوتاه

شکست خمشی ستون کوتاه
مهندسی عمران بهشهر
+ نوشته شده در جمعه ۲۹ دی ۱۳۹۱ ساعت ۱۱:۴۰ ق.ظ توسط تیسفون
|
گسیختگی برشی
شکست بادبند فولادی
شکست برشی ستون کوتاه
شکست خمشی ستون کوتاه
مهندسی عمران بهشهر
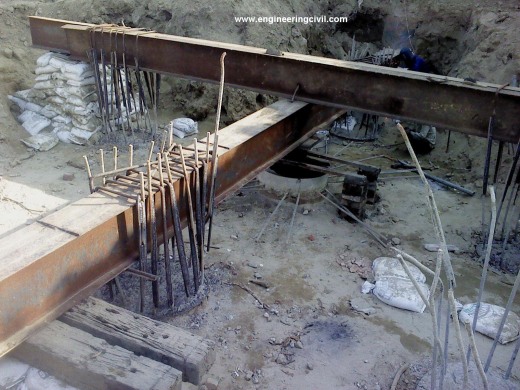
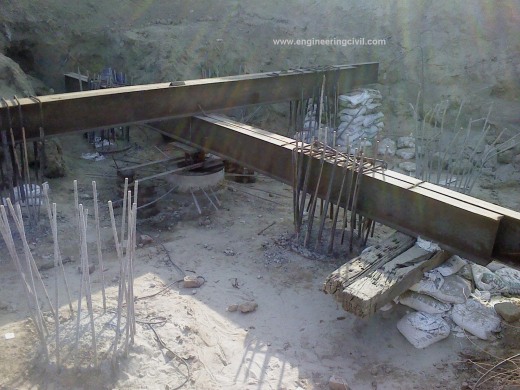
طراحی شمع ها هم جنبه های هنری دارد و هم جنبه های علمی. هنر طراحی در انتخاب مناسب ترین نوع شمع و روش نصب آن با توجه به شرایط بار گذاری و ساختگاهی است. جنبه های علمی طراحی شمع به پیش بینی و تخمین درست عملکرد شمع مستقر در خاک در حین نصب و بار گذاری دوران بهره برداری کمک می کند. این عملکرد بطور مؤثر بستگی به روش نصب شمع بستگی داشته و به تنهایی نمی تواند توسط خصوصیات فیزیکی شمع و مشخصات خاک دست نخورده پیش بینی شود. دانستن انواع شمع ها و روش های ساخت و نصب شالوده های شمعی مستلزم فهم علمی رفتار آنهاست. راهکارهای عملی طراحی شمع ها ۱- اطلاعات لازم و مکفی از شرایط ژئوتکنیکی محل ۲-شناخت دقیق نیروها و لنگرهای وارده از روسازه از نظر نوع، مقدار و جهت و اولویت بندی آنها ۳- شناخت عوامل محیطی از نظر آثار کوتاه مدت و دراز مدت بر مصالح شمع ۴-شناخت وضعیت پیرامون پروژه برای تصمیم گیری در مورد شیوه اجرای شمع ۵- انتخاب نوع شمع ۶- بررسی امکان پذیری ساخت وتولید شمع برای پروژه و محدودیت های ابعادی ۷- برگزیدن روش نصب شامل کوبشی، چکش زدن، در جا ریختن و … ۸- تعیین عمق مدفون شمع با توجه به شرایط خاک، بارهای موجود و امکانات اجرایی ۹- آرایش شمع های گروهی و تعیین نحوه عملکرد گروه و توجه به نکات مؤثر در طراحی از جمله تداخل شمع، ضریب کارایی، … ۱۰-تعیین توان کاربری شمع(تکی یا گروهی) با استفاده از تحلیل های معتبر استاتیکی ۱۱-تعیین توان باربری شمع با استفاده از آزمایشات درجا یا آزمایشات دینامیکی و تدقیق توان باربری ۱۲-دخالت دادن عوامل مؤثر پیرامونی برتوان باربری بدست آمده ۱۳-کنترل و ارزیابی نشست سیستم شالوده ۱۴- طراحی سازه ای شمع و کلاهک سه شمع ۱۵-انجام آزمایشات عملی بار گذاری استاتیکی یا دینامیکی(در صورت لزوم و صلاحدید) به منظور اطمینان از صحت اجرا و عدم آسیب دیدگی شمع ها در حین اجرا ۱۶-تعیین ضریب اطمینان انواع پی های عمیق از نظر اجرایی چنانکه گفته شد بر اساس استاندارد بریتانیا شمع ها به سه دسته طبقه می شوند:

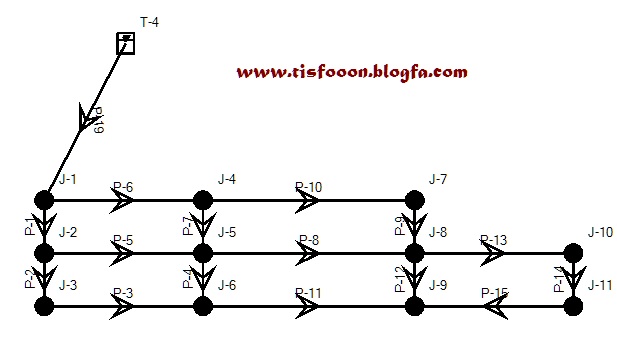
*برای قرار دادن دبی محاسبه شده در نرم افزارپس ازکشیدن گره ها ولوله ها با دوبار کلیک بر روی انها صفحه ای باز می شود که در انجا اطلاعات را می دهیم.
پسورد فایل:www.tisfooon.blogfa.com
New houses that are being built today are pursuing very strict energy efficiency standards. Needless to say, that is not the case for older properties. The most effective thing you’re able to do to make your home very energy efficient is usually to add insulation. Even though it is not practical for you to attempt it within your walls, it’s possible with blown-in insulation up in your attic. You will notice that your property is going to be cooler during the summer months and warmer in the winter months. If you live in an old house, you’ll find that the insulation employed is just newspapers
You will notice that insulation technology is quite advanced because of our concern for reducing energy and saving the environment. Insulating components receive an R-value, and this value is used to determine the amount of insulation needed, depending on the area of the country you live. In regions which usually get very cold over the winter require insulation with a high R-value while other areas may require just a lower one. Probably the most effective solutions to reduce your heating bill is blown-in insulation. There are many benefits to choosing blown-in insulation rather than the traditional fiberglass insulation including energy efficiency, how it can be used and installation
Of the top five advantages for using blown-in insulation, the first is that it is adjustable. You can control how much insulation you will need thus varying the R-value. Blow in a precise amount of inches for an R-value of 15, and so much more if you would need an R-value of 38. Another reason to choose blown-in insulation is that its usually produced from virgin materials so there is less chance of getting allergies. Youll also have a more effective seal since the materials can fill in cracks and crevices. Youll find it isn’t going to take much work to install and all open spaces will be filled therefore making your home more energy efficient
Installing blown-in insulation is straightforward for a newly framed house. All that has to be done is to staple a netting over the studs of the exterior wall and create a couple of small holes, then place a hose in the hole and fill up the inside with insulation. The insulating product blown in sticks to the studs, and completely fills all of the empty spaces. You then contain the wall with vapor barrier and after that drywall it. To perform ceiling insulation, you drywall the ceiling first then go into the attic and blow it in from there. Its more challenging with older dwellings considering that the wall covering will need to be removed. After the wall covering is removed, the steps are pretty much the same. If your household is very old, you could just make a hole in the wall and blow the insulation in, then cover it up
Even though it gives you a high initial cost, you will save a whole lot of money in the long run. With the lower heating costs, as well as a more comfortable living, having blown-in insulation makes a lot of sense

<<در ضمن نمونه ای از پروژه با استفاده از این نرم افزاربه زودی در سایت قرار میدهم.>>


منبع: سایت شخصی مهندس استیلا
Scope of work:
Construction joint sealing with hydrophilic rubber profile bonded to concrete with water swelling polyurethane based adhesive.
I. SIKA MATERIALS
Sika Hydrotite CJ type:
• Hydrophilic rubber sealing profile
• Made of high durable material which can not be washed out by water.
• Specific shape profile which allow optimal expansion
• Treated with delay coating to preserve it from early expansion when in contact with freshly poured concrete
• Easy to place Sika Swell S2
• Extrudible water swelling material
• Use for bonding Sika Hydrotite CJ Type to concrete surface.
II. CONCRETE SURFACE PREPARATION
• Concrete surface shall be sound and solid, free of laitance, oil, dust, loose and friable particles
• Concrete shall be dry prior application of Sika Swell S2 material.
III. APPLICATION PROCEDURE
• Use Sika Swell S2 applied in thin bed to glue Sika Hydrotite CJ type to concrete substrate (consumption of Sika Swell S2 shall be approx. 30-50 ml per meter of Sika Hydrotite CJ type depending on concrete roughness)
• Apply Sika Hydrotite CJ type to the still freshly applied Sika Swell S2.
• In meeting point (edge), butt joint the Sika Hydrotite CJ type and covered with Sika Swell S2
• It is recommended to wait for min. 4 hours until Sika Swell S2 has sufficiently cured before to pour the new concrete. Meanwhile, the concrete formwork can be placed.
The minimum thickness of concrete around Sika Hydrotite CJ type should be at least 100 mm on each side.
Please Consult technical data sheet for further information.
این پل دارای ۲ خط سواره رو و ۲ خط برای قطار میباشد

پل” اورساند” Öresund نام پلی استراتژیک به طول ۷.۸ کیلومتر است که کشورهای سوئد و دانمارک(شهرهای مالمو و کپنهاگ) را بهم پیوند می دهد. این پل که دارای ۷.۸ کیلومتر طول و ۲۳.۵ متر عرض است و بلندترین پل معلق اروپا نیز محسوب می شود.پل اورساند دارای دو طبقه می باشد که طبقه نخست آن مخصوص عبور و مرور وسایل نقلیه و طبقه زیرین آن برای عبور قطار پیش بینی شده است.عملیات ساخت پل اورساند از سال ۱۹۹۵ میلادی آغاز شد و چهار سال بطول انجامید.این پل در دوم جولای سال ۲۰۰۰ میلادی رسماً افتتاح شد و عبور و مرور در آن جریان یافت.
هدف اصلی از ساخت این پل، اتصال دو شهر مالمو سوئد و کپنهاگ دانمارک و افزایش مبادلات اقتصادی و فرهنگی بین دو کشور بود. همچنین با ساخت این پل، مردمی که در شهر مالمو زندگی می کردند (به دلیل وجود نرخ بیکاری بیشتر در مالمو) برای کار به کپنهاگ می آمدند ولی برای اسکان خود مجددا به مالمو باز می گشتند و بدین شکل به تعامل فرهنگی و اقتصادی بین دو کشور کمک قابل توجهی می کردند. پیدا کردن کار مناسب در دانمارک به مراتب از پیدا کردن کار مناسب در سوئد راحت تر و قیمت اجاره خانه در سوئد به مراتب از دانمارک ارزانتر است. بهمین دلیل در حدود یک سوم جمعیت شهر مالمو در سوئد متولد نشده اند. همچنین، تاسیس دانشگاه مالمو Malmö University و وجود پل اورساند موجب شد تا تعداد دانشجویان خارجی در این شهر جنوبی سوئد افزایش یابد. بر طبق آمارها، در حدود ۱۶۰۰۰ نفر روزانه به قصد سفرهای کاری از این پل عبور و مرور می کنند و در حدود ۹۰۰۰ نفر شهروند سوئدی مقیم شهر مالمو هم اکنون وجود دارند که در دانمارک متولد شده اند. این تعداد شهروند در سال ۲۰۰۰ میلادی و قبل از ساخت پل در حدود ۳۳۰۰ نفر بود.
پروژه ارتباط سوئد و دانمارک که طرح آن نخستین بار توسط دانمارکی ها به دولت سوئد پیشنهاد شد از ساخت یک پل معلق(پل اورساند)، یک تونل و یک جزیره و یک شبه جزیره مصنوعی تشکیل می شود.
یک جزیره مصنوعی( Peberholm) در بخش دانمارک از طریق یک تونل زیردریایی چهارکیلومتری(تونل Drogden) به یک شبه جزیره مصنوعی در Kastrup متصل شده است. این جزیره و شبه جزیره از میلیونها مترمکعب سنگ و سیمان و از لایروبی بستر دریا ساخته شده است . علت ساخت جزیره مصنوعی، اتصال تونل به پل اورساند بوده است. ساخت پل اورساند حدودا ۶ میلیون دلار، ساخت تونل ۴ میلیون دلار و ساخت جزیره مصنوعی ۲ میلیون دلارآمریکا هزینه دربر داشته است.

نمایی از جزیره مصنوعی
در سالهاي اخير تکنولوژي ساخت فولاد پيشرفت بسيار کرده است. تحقيقات و آزمايشهاي لازم بر روي HPS نشان داده است که استفاده از اين فولاد در پروژه هاي بزرگ باعث صرفه اقتصادي مي شود. مقاومت بالا سختي بالا و عدم گسيختگي ترد و ناگهاني مقاومت در برابر هوازدگي و قابليت جوش بالا ويژگي هاي اين نوع فولاد است. استفاده از فولادHPS که هم اکنون در ايالات آمريکا در پروژه هاي پل رواج دارد به طراحان و مهندسان اجازه مي دهد تا از شاه تيرهاي کمتري استفاده کنند و از HPS باعث افزايش طول دهانه ي پل مي شود در کل مي توان گفت HPS به عنوان مصالحي با يک ترکيب بهينه از خواص مورد نياز براي ساخت سازه هاي ارزان مطمئن و بادوام در طول عمر سرويس خود قابل استفاده مي باشد.
منبع:www.mihansaze.com

Lantern Pavilion by AWP and Atelier - Oslo - norway

Sunrise Tower In Kuala Lumpur

Shopping Temple Frankfurt

Cooper River Bridge, placing plat segment, Carolina , US
مهندسی عمران بهشهر
Like clothing fashion styles, home decoration also has distinctive yearly trendy styles. Therefore for the year of 2011, we’ve been proud to review some of the leading home decors that will definitely impress your friends and family or perhaps even inspire you to apply some of the ideas in your own home.
Everything out of date is cutting edge again, and vintage designed rooms are definitely “in” again. It is not only popular in weddings but in home decorating in addition. What’s old in the 50′s, 60′s, or 80′s can give a new look to your home this year, so get your out of date chair frames, tables and couches and remember that you could always buy new upholstery for them. There are community retailers that offer vintage furniture like a table made from old feed sacks, so try and find one in your town to get some fresh ideas.
Another way to create a style statement is with wall coverings in the vintage theme. They are able to create almost any style and ambiance with the right selection. Another strategy that is working well in 2011 is the usage of murals inside and outside your house. There isn’t any limitation to the places these can be applied. A fantastic advantage of modern murals is they could very well be moved to your new home after you sell your old one. A more extreme style may be the use of metallic paint on the ceiling which is further enhanced by a striking lighting fixture.
Concerns about the environment have prompted some people to look for eco-friendly solutions. Reducing energy is a big consideration which has created interest in new technologies such as LED’s (Light Emitting Diodes.) In kitchen supply stores a lot more items now are accessible in eco-friendly versions. Even though they seem indistinguishable, they are made from plastic materials that are developed to biodegrade rapidly. Ceiling custom light fixtures are viewed as “dated” by design experts who now favor hanging lights in virtually every room.
The “in” color palette for 2011 re-introduces several old favorites once again. Some trendy colors like orange and lime green have a touch of playfulness about them. For a more traditional and vintage theme you can always go with the neutral colors to establish a sophisticated effect. The soothing turquoise and greenish tones will continue to be a hit in 2011.
The kitchen is known to be the center of a house. If you ever want to redesign your kitchen, create an open, spacious and well-ventilated environment. Spend some time designing your kitchen and deciding on the finishes given that you’ll be living with them every day. To stay environmentally conscientious it is best to request recyclable materials whenever feasible.
It is never too late to create a significant improvement to the look of your house, both inside and out. Hopefully you now have a good enough sense of the popular themes for 2011 to carry out a few of them in your own home with lasted home decor trends.

If you have decided to go down the self-build route, you’ll need to buy a plot of land on which to construct your home. Depending on where it is and what state it is in when you make the purchase, there are a few things you’ll need to do to get it ready for work to start on your new home.
Here are a few steps you’ll need to take if you have raw land that you want to build on.
![]()
Clearing the area
Essentially, you need a blank canvas before you can begin the building process. This means you’ll have to remove any trees or bushes that are on your plot. It’s not enough to simply fell the trees and cut back the foliage – you’ll have to remove the stumps and roots from the ground to give you as level a surface as possible.
If your plot is large enough to have room for a garden, look carefully at any trees before you start removing them, as you may decide established plants can provide a useful barrier at one edge of your land. It is vital to measure the area carefully and know exactly where the outer walls of your property will be, so as to ensure the trees won’t impede the construction process, or potentially cause problems with your home further down the line.
Excavation work
Once the land has been cleared, you can turn your attention to excavating it for the foundations. This is the groundwork for your home and will ultimately determine its stability, so it is vital you get this right. Your plans should specify what foundation trenches are required and how deep these will need to be. Once you start digging the ground, you may find your plans have to be amended if the soil is not as stable or solid as initially thought.
Of course, you’ll need heavy machinery to dig the foundations of your home, which is where plant hire firms can be of assistance. You can rent all the digging equipment you need if you are intending to do as much of your self-build project yourself as possible. Should you hire contractors to help with your scheme, they will more than likely have access to all the machinery you require. You’ll need to balance the cost of these two options, as well as honestly assessing your skills, before making a decision about which road to go down.
The depth of the foundation trenches you need to dig will depend on the type of foundations you are planning to use. There are four main options: simple, engineered, piling and rafts. The most suitable choice will depend on the state of the ground you are building on, so consult more than one specialist contractor to determine what the best solution for your construction project is.
Other considerations
You need to ascertain whether you have to arrange for an electrical, water or gas supply to be laid into your plot that can eventually connect to your home. You also need to work out how you will link your property with the sewerage system and allow for all of these things when excavating and laying the foundations of the house. In many cases, plots will already have these services in place, but don’t make the assumption they are there – always check!
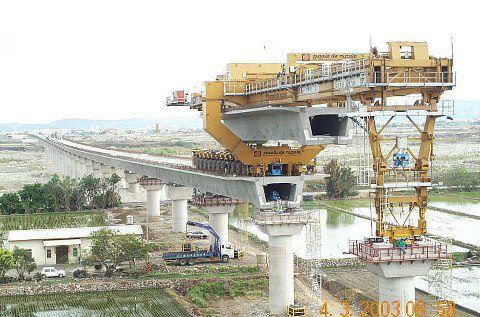
Various types of bridge superstructures are Arches, Masonry, C.C, R.C.C Girder and deck slab, Solid Slab, R.C.C T-Beam Slab, R.C.C Box Beam, Voided Slab, P.S.C Two Girder, Three Girder, Multi-Girder, Box Girder, Simply supported continuous Cantilever, Balance Cantilever, Hammer Head, Bow string girder, composite construction, cable stayed, suspension.
... Selection of Proper Superstructure for Bridge
Generally the following criteria should be followed for selection of superstructure depending on span length
1.Spans upto 10m. R.C.C solid slab
2. Spans- 10 to 15m R.C.C solid slab /Ribbed slab,
3. Spans – 15m.to 20m R.C.C Multi-girder slab system.
4. Spans – 20m.to 30m P.S.C Girder/Box type superstructure.
5. Span – 30m to 60m P.S.C Box girder.
For spans more than 60 m the discussions should be held with Superintending Engineer, Designs Circle regarding selection of the type of superstructure. 2-girder system for two-lane superstructure should not be proposed unless other alternatives are considered unfeasible.
For spans up to 10m solid slab superstructures are found most suitable. As the span increases beyond 10m the thickness of solid slab poses difficulties during concreting. Lot of construction joints are created in the structure if proper program of concreting is not prepared and insisted upon. It is, thus, desirable to go for ribbed slab or multi-girder system of deck slab.
Spans between 10 m to 15 m could be conveniently covered in this manner.
Spans between 15m to 20m, multi-girder system would be desirable. Two-girder system should be avoided as far as possible. In case of single lane bridges two-girder system is natural choice. But this system should not be preferred in severe exposure conditions. There is a school of thought that damage to one girder makes the entire structure unstable and unsafe and hence multi girder system is to be preferred.
For spans between 20m and 30m R.C.C box type superstructure is considered suitable. Use of R.C.C girder and slab system might result in excessive deflections under live load. Box girder is a more desirable shape for the superstructure.
Beyond 30 m span, it is necessary to go for P.S.C. This enables us to somewhat restrict the deck height to the desired level. For spans greater than 60m discussions should be held with Superintending Engineer, Designs Circle for deciding the type of bridge superstructure. The parameters influencing selection of superstructure need to be studied.

پژوهشگران پژوهشکده تربیت بدنی و علوم ورزشی با استفاده از ذرات نانو کف پوشهایی را عرضه کردند که ضمن جذب ضربه دارای طول عمر بالایی است.
|
امین هوش افزا از کارشناسان دفتر ارتباط با صنعت پژوهشکده تربیت بدنی و علوم ورزشی با بیان اینکه این کف پوشها به صورت یکپارچه در محل اجرا میشود، افزود: این کف پوشها از جنس پلیمرهای "پلی یورتان" است که مطابق با استانداردهای جهانی تولید شده است. وی با بیان اینکه در این کف پوشها از نانو ذرات آلومینا (AL2OC) استفاده شده، اظهار داشت: اندازههای نانو ذرات استفاده شده در حد 30 نانومتراست. منبع:shasa.ir |
 * مهندسی عمران و معماری بهشهر(تیسفون) *